

Sunday, March 11, 2018
Mermaizing
Sometimes a party theme really inspires me. Mermaids screamed out to me "shaker card." I haven't made too many of them but I'm glad I attempted this one. The birthday girl LOVES glitter but her mom not so much so this was a way to make them both happy and let me play in my craft room. The photo doesn't do the shimmer and bling justice. Just trust me, it's so much more mermaizing in person.

Monday, July 31, 2017
A card fit for a fancy mermaid
One of my daughter's friend's has a winter birthday and always has a half birthday party in the summertime so that the family can use their pool. This year's theme was Fancy Nancy mermaid. The photo doesn't do justice to the card I made and its awesome sparkle-y-ness. I love clear Stickles! I'm pretty sure I used Stardust. The blue on the edges is China Blue Distress ink and the patterned paper is Basic Grey. The friend's mom said that they never keep any cards except the ones we give her and that this was definitely her favorite!


Tuesday, February 14, 2017
Silhouette Cameo cuts shrink plastic to make a "No gifts, please" Dora charm bracelet
Has your child ever gotten one of those birthday party invitations that says, "No gifts, please"? And you kind of panicked because you want to respect the parents' wishes but at the same time, you're thinking, "C'mon, this kid is only six!" (or five or whatever, fill in with any age up to what, about 10? 12?)
Isn't half the fun of having a birthday party receiving presents from all of your friends? Especially after you've been going to their birthday parties all year and giving them presents?! It really hardly seems fair.
A few weeks ago my daughter got invited to a new schoolmate birthday party. Before we had even received the (no gifts, please) invitation, she came home from school saying that Lana wants a Dora & Friends charm bracelet because she flushed hers down the toilet.
I Google Dora charm bracelets and am appalled at how much they now cost now that Dora & Friends is apparently no longer popular. $20?! For something that I'm pretty sure my daughter had on her Amazon wishlist at one point for $5 or $8.
Then we get the invitation and I figure I'm off the hook. I don't have to spend $20 on this bracelet because the invitation says "No gifts, please." But my daughter insists that this is the only thing this girl wants and I start feeling guilty about showing up to a six-year-old's party empty-handed.
What's a mom to do? Get crafty, of course! I started thinking about how I could make charms for a Dora charm bracelet. One of my first thoughts -- my Silhouette Cameo which I have been making a concerted effort to use more because it was a pretty big investment. Plus it's just plain fun to see what I can make.
One thing I really love is print and cut. It's so...easy and awesome. If you haven't yet tried it out, put it on your to do list! I've made a bunch of basic print and cut items using card stock like embellishments for scrapbook pages and stickers for my daughter. I started wondering what other materials I could cut that would be more durable.
In an "aha!" moment I realized that some time back I had purchased shrink plastic. I used a bit of it up making charms by stamping with permanent ink, coloring, cutting out and shrinking in the toaster oven. I remembered it being less than fun to cut out. Could my Cameo cut it?
I Googled it and a few people said they had tried it, with varying success. I noted the cut settings they used and decided I would start with those. I downloaded some images of Dora and her friends and thought about how I would make this work. First I was going to cut out each character's head, but then I looked at the real bracelet and the faces were in the shape of hearts. It seemed easier to cut hearts so I made a design in Silhouette studio.
I sized the hearts to about an inch then increased the size to 300%, figuring they would shrink down to about one third of the original size. Making something into a print and cut file it really easy -- just go to the Registration Marks window and select the registration marks style appropriate for your machine. Then place your design within the registration marks. Trace your image to create your cut lines. Send the image to your regular printer. After you print it, cut it out with your Silhouette like you would normally do. The machine will read the registration marks and cut out your printed image.
My first attempt at printing the images resulted in a runny mess that didn't seem like it would ever dry. I think it was because I used high quality printing, but possibly it was the shrink plastic itself. So I tried a different brand of the shrink plastic I had on hand and printed with regular settings and it came out just fine.
Then came time to cut. I set the Silhouette to Blade 10, Speed 1, Depth 33, double cut, as recommended on several blogs I had read. As recommended, I sent it through twice, essentially cutting four times (double cut, then do not unload, just send the job again). And it just scored the plastic, not cutting all the way through. I was so disappointed!
I thought I had ruined the project but since really these were just simple hearts, I cut through the scored lines with an X-Acto knife and it worked just fine. The edges were a tiny bit rough and I probably should have sanded them but at this point I was in a bit of a hurry to finish the project before the party. I punched a hole to hang the charms with my Crop-A-Dile (in hindsight I should have not put a hole in the design in Silhouette because my punch was a little smaller than the hole so a little white showed around the edges, but it wasn't too bad).
The I went to use my Silhouette to cut some cardstock. I took out the blade to change the setting back to 4 and realized I had never changed it to 10! So probably the shrink plastic would have cut right through had I actually used the correct setting. I haven't yet had a chance to experiment but I'm almost sure that if it would score it to the extent that it did on 4, it would cut clean through on 10.
To finish the bracelet I shrank the charms them in the toaster oven according to the shrink plastic's instructions. I put a piece of white cardstock on my baking sheet to prevent and shiny spots (and because I wasn't totally convinced that the ink wouldn't rub off after melting) and a piece on top of the charms to keep them from curling too much. They came out a little convex for some reason but I thought that kind of enhanced the heart design.
I added jump rings through the holes and strung up the charms with some flower beads from Oriental Trading that I had actually bought with my daughter's Girl Scout troop in mind (there are plenty left for them!) and some large plain white seed beads. The final result:

Of course then we get to the party and the little girl's mom is like, "I don't think she even likes Dora anymore..." But the birthday girl seemed happy with the bracelet, my daughter and I didn't feel bad about going to the party empty-handed and I tried a new technique that I will definitely repeat (hopefully with little more success!) in the future.
Sunday, January 1, 2017
Minions card
Happy New Year! So I'm going to try to keep a resolution about blogging... but I don't want to make too big of a deal about it because yeah, I'm pretty sure I'd still rather create things than write about them! But I am going to try.
Here's a project that has absolutely nothing to do with New Years, a card that I made for a friend of my daughter who turned six last week. She insisted that he likes Minions so that's what he got, a Minion board game and a Minion card. I found a super cute cut file to download (that I modified slightly) and I cut it with my Silhouette. See, I told you I've been trying to use it more!

This was the first item that I've made with so many layers. I actually cut all of the pieces at once by trimming scraps to correct size and putting them on the cutting mat in the corresponding places. So much easier than I thought it would be! I didn't have a slightly darker blue for the pocket so I used the same blue as the overalls but colored it with a VersaMark marker.
Then I pulled out this patterned paper that's been in my scrap stash probably since I started scrapbooking in 1996. Remember Paper Pizzazz and how patterned paper wasn't usually sold in individual sheets back then but in booklets? I think this was one of theirs. It has never worked for anything in the past 20 years but somehow I liked it for this card.
Saturday, December 31, 2016
Easy Silhouette Cameo holiday gifts
I got a Silhouette last year for Chrismukkah. I FINALLY put it to use for the holidays this year. I think I've overcome my fear of vinyl and really I have no idea why I was afraid of HTV -- it is so much easier to weed than 651 and it went on really easily with an iron. Siser Easyweed IS easy to weed!
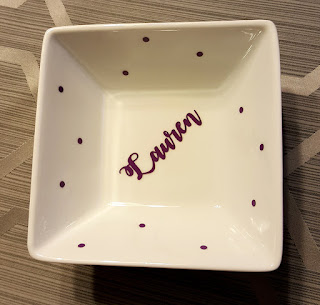
First a little adhesive vinyl project. I needed something ASAP for my daughter's dance teacher. Like literally I needed to come up with something during my daughter's 1 1/2 hour dance class. My daughter has recently become obsessed with Rainbow Loom bracelets (what, like three years after the rest of the world?!) and had made her teacher a little bracelet but really that wasn't enough, Fortunately I had picked up this little dip bowl at Walmart. I cut the teacher's name out of purple vinyl (I think it's Oracal 651 but not totally sure -- got it from a sign maker's shop) and stuck it in the middle of the bowl. It looked a little plain so I cut out some little circles and applied them on the sides. Voila, personalized jewelry dish to go with Rainbow Loom bracelet!
The success of that project made me confident enough to try some HTV. I had ordered a starter pack from Amazon and it had just been sitting in my craft room collecting dust because I don't have a heat press and quite frankly, I detest ironing. Part of my Walmart haul included two packs of flour sack towels, which were like five for $5. I decided to try personalizing them for holiday presents because I figured they were hardly an investment if I totally messed up. I designed all of the images myself in Silhouette Studio, which I am happy to report is so much more user friendly that I first assumed and I've been using more and more instead of Illustrator. I used my Silhouette to cut the images out of Siser HTV (don't forget to mirror and put the shiny side down), weeded the designs (so much easier than I expected), watched a Siser video on the time and temperature for using and iron, and applied them using the iron that my husband and I got as a wedding present (which only he had used in the prior almost nine years).

I wrapped most of them up in pint sized berry boxes that I had left from my daughter's Strawberry Shortcake birthday party. I cut patterned paper to fit each side, put in the towel and tied on a tag with bakers twine (sorry, no photos of the wrapping). I loved how they came out and so did the recipients. One told me it was the best Christmas present she got this year!
First a little adhesive vinyl project. I needed something ASAP for my daughter's dance teacher. Like literally I needed to come up with something during my daughter's 1 1/2 hour dance class. My daughter has recently become obsessed with Rainbow Loom bracelets (what, like three years after the rest of the world?!) and had made her teacher a little bracelet but really that wasn't enough, Fortunately I had picked up this little dip bowl at Walmart. I cut the teacher's name out of purple vinyl (I think it's Oracal 651 but not totally sure -- got it from a sign maker's shop) and stuck it in the middle of the bowl. It looked a little plain so I cut out some little circles and applied them on the sides. Voila, personalized jewelry dish to go with Rainbow Loom bracelet!

The success of that project made me confident enough to try some HTV. I had ordered a starter pack from Amazon and it had just been sitting in my craft room collecting dust because I don't have a heat press and quite frankly, I detest ironing. Part of my Walmart haul included two packs of flour sack towels, which were like five for $5. I decided to try personalizing them for holiday presents because I figured they were hardly an investment if I totally messed up. I designed all of the images myself in Silhouette Studio, which I am happy to report is so much more user friendly that I first assumed and I've been using more and more instead of Illustrator. I used my Silhouette to cut the images out of Siser HTV (don't forget to mirror and put the shiny side down), weeded the designs (so much easier than I expected), watched a Siser video on the time and temperature for using and iron, and applied them using the iron that my husband and I got as a wedding present (which only he had used in the prior almost nine years).

I wrapped most of them up in pint sized berry boxes that I had left from my daughter's Strawberry Shortcake birthday party. I cut patterned paper to fit each side, put in the towel and tied on a tag with bakers twine (sorry, no photos of the wrapping). I loved how they came out and so did the recipients. One told me it was the best Christmas present she got this year!
Tuesday, November 3, 2015
Shake your booty shaker card
It has been a long time since I made a shaker card. I always found them rather... fussy. But this one actually worked out well for me. I knew I wanted a black and purple color scheme for this card. I ended up being inspired by this purple strip of cardstock that I found on my desk, which I had used to punch a circle for another project.

I wrapped a piece of wide black polka dotted washi tape around the card. I like how it is kind of translucent. Then I stamped the sentiment above the tape and embossed with silver powder.
I attached a piece of clear plastic that I cut from some packaging (I'm always up for upcycling). Then I added pieces of foam tape around the circle on the back side and filled it with large silver and iridescent glitter. After deciding that I would use a black panel on the white card base, I attached a piece of black cardstock slightly larger than the circle opening with the foam tape. I think this is where I have always gone wrong in the past -- I had tried to attach the shaker panel directly to the card instead of closing it off with another piece of paper.
I dry embossed another piece of black cardstock and attached it to a folded card. I punched a border from white cardstock and attached it across the bottom of the card. Then I adhered the purple panel using foam tape all around the edges. I stamped the letters onto white cardstock and embossed with silver powder, ran them through my Xyron, cut them out freehand and layered them on the card (one of my favorite easy personalization techniques).
Finally I found the perfect paper flower to attach with a glue dot and topped it off with a large gem that I had purchased for a decorating supply at my daughter's birthday party.
Thursday, May 28, 2015
Bright pink and orange Mother's Day
This card just makes me happy. I don't usually pair together hot pink and orange but I'm going to start doing it more often! I wanted to make a fun Mother's Day card for my mother-in-law this year.
 The ribbon has been in my stash forever but it always seems to wide for me to use it. It worked perfectly here and I picked up the colors from it to use in the rest of the card. I've been trying to use my millions (OK, really dozens) of embossing folders more often so I used this one as the entire background panel. I think it's made my Darice as most of mine are. I used the Ranger Blending Tool to lightly blend Tangerine Colorbox Fluid Chalk ink to emphasize the flowers and circles. I rounded the corners with my Corner Chomper (I have the aqua one), ran it through my Xyron, wrapped a piece of ribbon around the edges and attached the panel to a hot pink card.
I stamped the sentiment (a little crookedly) on white cardstock with the tangerine ink then mounted it on hot pink cardstock. I sprayed a white Prima flower with Stephanie Barnard Colorbox dye spray ink in Guava, attached it to the card with a Zot glue dot after it dried, layered on a white flower and topped it with an orange gem. I added a gem to the other end of the sentiment strip after I glued it under the ribbon. Finally I tied a bow and adhered it over the ribbon with a glue dot. The bow would probably have been to lumpy to mail but thankfully we were delivering it by hand!

I stamped the sentiment (a little crookedly) on white cardstock with the tangerine ink then mounted it on hot pink cardstock. I sprayed a white Prima flower with Stephanie Barnard Colorbox dye spray ink in Guava, attached it to the card with a Zot glue dot after it dried, layered on a white flower and topped it with an orange gem. I added a gem to the other end of the sentiment strip after I glued it under the ribbon. Finally I tied a bow and adhered it over the ribbon with a glue dot. The bow would probably have been to lumpy to mail but thankfully we were delivering it by hand!
Subscribe to:
Comments (Atom)