

Showing posts with label birthday. Show all posts
Showing posts with label birthday. Show all posts
Sunday, March 11, 2018
Mermaizing
Sometimes a party theme really inspires me. Mermaids screamed out to me "shaker card." I haven't made too many of them but I'm glad I attempted this one. The birthday girl LOVES glitter but her mom not so much so this was a way to make them both happy and let me play in my craft room. The photo doesn't do the shimmer and bling justice. Just trust me, it's so much more mermaizing in person.


Sunday, January 1, 2017
Minions card
Happy New Year! So I'm going to try to keep a resolution about blogging... but I don't want to make too big of a deal about it because yeah, I'm pretty sure I'd still rather create things than write about them! But I am going to try.
Here's a project that has absolutely nothing to do with New Years, a card that I made for a friend of my daughter who turned six last week. She insisted that he likes Minions so that's what he got, a Minion board game and a Minion card. I found a super cute cut file to download (that I modified slightly) and I cut it with my Silhouette. See, I told you I've been trying to use it more!

This was the first item that I've made with so many layers. I actually cut all of the pieces at once by trimming scraps to correct size and putting them on the cutting mat in the corresponding places. So much easier than I thought it would be! I didn't have a slightly darker blue for the pocket so I used the same blue as the overalls but colored it with a VersaMark marker.
Then I pulled out this patterned paper that's been in my scrap stash probably since I started scrapbooking in 1996. Remember Paper Pizzazz and how patterned paper wasn't usually sold in individual sheets back then but in booklets? I think this was one of theirs. It has never worked for anything in the past 20 years but somehow I liked it for this card.
Here's a project that has absolutely nothing to do with New Years, a card that I made for a friend of my daughter who turned six last week. She insisted that he likes Minions so that's what he got, a Minion board game and a Minion card. I found a super cute cut file to download (that I modified slightly) and I cut it with my Silhouette. See, I told you I've been trying to use it more!

This was the first item that I've made with so many layers. I actually cut all of the pieces at once by trimming scraps to correct size and putting them on the cutting mat in the corresponding places. So much easier than I thought it would be! I didn't have a slightly darker blue for the pocket so I used the same blue as the overalls but colored it with a VersaMark marker.
Then I pulled out this patterned paper that's been in my scrap stash probably since I started scrapbooking in 1996. Remember Paper Pizzazz and how patterned paper wasn't usually sold in individual sheets back then but in booklets? I think this was one of theirs. It has never worked for anything in the past 20 years but somehow I liked it for this card.
Tuesday, November 3, 2015
Shake your booty shaker card
It has been a long time since I made a shaker card. I always found them rather... fussy. But this one actually worked out well for me. I knew I wanted a black and purple color scheme for this card. I ended up being inspired by this purple strip of cardstock that I found on my desk, which I had used to punch a circle for another project.

I wrapped a piece of wide black polka dotted washi tape around the card. I like how it is kind of translucent. Then I stamped the sentiment above the tape and embossed with silver powder.
I attached a piece of clear plastic that I cut from some packaging (I'm always up for upcycling). Then I added pieces of foam tape around the circle on the back side and filled it with large silver and iridescent glitter. After deciding that I would use a black panel on the white card base, I attached a piece of black cardstock slightly larger than the circle opening with the foam tape. I think this is where I have always gone wrong in the past -- I had tried to attach the shaker panel directly to the card instead of closing it off with another piece of paper.
I dry embossed another piece of black cardstock and attached it to a folded card. I punched a border from white cardstock and attached it across the bottom of the card. Then I adhered the purple panel using foam tape all around the edges. I stamped the letters onto white cardstock and embossed with silver powder, ran them through my Xyron, cut them out freehand and layered them on the card (one of my favorite easy personalization techniques).
Finally I found the perfect paper flower to attach with a glue dot and topped it off with a large gem that I had purchased for a decorating supply at my daughter's birthday party.

I wrapped a piece of wide black polka dotted washi tape around the card. I like how it is kind of translucent. Then I stamped the sentiment above the tape and embossed with silver powder.
I attached a piece of clear plastic that I cut from some packaging (I'm always up for upcycling). Then I added pieces of foam tape around the circle on the back side and filled it with large silver and iridescent glitter. After deciding that I would use a black panel on the white card base, I attached a piece of black cardstock slightly larger than the circle opening with the foam tape. I think this is where I have always gone wrong in the past -- I had tried to attach the shaker panel directly to the card instead of closing it off with another piece of paper.
I dry embossed another piece of black cardstock and attached it to a folded card. I punched a border from white cardstock and attached it across the bottom of the card. Then I adhered the purple panel using foam tape all around the edges. I stamped the letters onto white cardstock and embossed with silver powder, ran them through my Xyron, cut them out freehand and layered them on the card (one of my favorite easy personalization techniques).
Finally I found the perfect paper flower to attach with a glue dot and topped it off with a large gem that I had purchased for a decorating supply at my daughter's birthday party.
Monday, February 24, 2014
4th birthday boy card
Yes, I have been crafting. Here and there. No I have not been blogging. Anywhere.
Here's a quick card that I made for a four-year-old whose birthday party my daughter went to over the weekend. I got to make it in the time that my daughter made her own card. Hers mostly involved scribbles, so I had to pull this together pretty quickly.

Ran some scrap navy cardstock through my Texture Boutique (really almost typed Bowtique there -- entirely too much Mickey Mouse Clubhouse has been playing at our house) for the background. Cut some scraps into banners using the quick square punch technique. (Just slide the end of the strip into a large square punch at a 45 degree angle, squeeze and you've got a banner.) Stamped the birthday boy's name letter by letter onto white cardstock, cut out freehand and edged with blue ink. Stole a foam number four from my daughter's craft stash, tied around a piece of bakers twine and the card was done. With 20 minutes to spare before we had to leave for the party. Whew!
Funny, I looked back at cards I've made for the same kid the past two years, and apparently I think banners and bunting when I think of him.
Last year's card:
 The year before:
 I'm definitely going to have to come up with something new next year!
Here's a quick card that I made for a four-year-old whose birthday party my daughter went to over the weekend. I got to make it in the time that my daughter made her own card. Hers mostly involved scribbles, so I had to pull this together pretty quickly.
Ran some scrap navy cardstock through my Texture Boutique (really almost typed Bowtique there -- entirely too much Mickey Mouse Clubhouse has been playing at our house) for the background. Cut some scraps into banners using the quick square punch technique. (Just slide the end of the strip into a large square punch at a 45 degree angle, squeeze and you've got a banner.) Stamped the birthday boy's name letter by letter onto white cardstock, cut out freehand and edged with blue ink. Stole a foam number four from my daughter's craft stash, tied around a piece of bakers twine and the card was done. With 20 minutes to spare before we had to leave for the party. Whew!
Funny, I looked back at cards I've made for the same kid the past two years, and apparently I think banners and bunting when I think of him.
Last year's card:
Sunday, November 3, 2013
Fastest cards ever
So this weekend was a busy one and the crafting just couldn't take priority. I've been working for months on a fundraiser for a really great organization that I'm on the Board of the Friends for and our big event was Saturday night. I was stuffing grab bags, making luminaries and doing other last minute tasks. But I still like to give handmade birthday cards and my daughter had a party for not just one three-year-old, but two. Consequently, I made two of the fastest birthday cards ever. Literally I slapped them together minutes before we left for the joint party, while my husband took a shower. Totally not my typical style of agonizing over the position of each element but it was rather freeing. Sorry about the abysmal photography -- I took the pictures with my phone in the (moving) car on the way to the party. That dark background is the jeans I was wearing.


The secret to this super fast card design was having 1 inch strips of patterned paper already in my scrap box. I've got tons because as an 8.5 by 11 scrapbooker, I often cut 1 inch off of 12 by 12 papers. I selected three strips that used purple for my daughter's friend Violet and three with oranges for the little girl named Clementine. I stamped some birthday and letter stamps using chalk ink, punched two circles, added scrap ribbon and voila! The stamping is rather messy and not up to my usual standards but I'm thinking three-year-olds won't really notice.
Do you have any tricks for getting cards made fast?
The secret to this super fast card design was having 1 inch strips of patterned paper already in my scrap box. I've got tons because as an 8.5 by 11 scrapbooker, I often cut 1 inch off of 12 by 12 papers. I selected three strips that used purple for my daughter's friend Violet and three with oranges for the little girl named Clementine. I stamped some birthday and letter stamps using chalk ink, punched two circles, added scrap ribbon and voila! The stamping is rather messy and not up to my usual standards but I'm thinking three-year-olds won't really notice.
Do you have any tricks for getting cards made fast?
Monday, September 30, 2013
Minnie Mouse 3rd Birthday Party
Well, the party's been over for a week but my house is still decorated like Minnie Mouse Birthday Land so it can't be too late to post some pics. The party was super fun although I think the guests had more fun than the birthday girl. She was a bit overwhelmed! There ended up being 20 kids. I'm thrilled that she has such a large social circle but it was pretty crazy, especially since it was rainy that morning so we had the party inside. Fortunately we have a large living room where the grownups could socialize and were also able to use the living space in the attached in-law apartment as an "activity room" for the kids.
I was too busy running the party to take pics so thankfully my daughter's sitter stepped in and snapped away with my camera. Unfortunately she didn't really know how to use it so the shots aren't that great, but I think you'll get the idea. I am a little bummed that the fantastic work of my super talented sister-in-law wasn't documented well, but you can check out her blog at www.eventsthatsparkle.net.

My SIL made this SUPER CUTE Minnie Mouse using Styrofoam balls. This photo doesn't do it justice. She also ordered this banner off of Etsy that we hung over our mantle and we were both annoyed because we knew we could have made it ourselves if only our craft supplies were anywhere to be found.

I also bought this huge Minnie sign at Party City that we planned to put on our fence and use as a photo booth but we ended up just attaching it to the wall. My daughter was one of the few kids that was (surprisingly) cooperative about having her photo taken. As my SIL said, it was pretty cheezy but it did add to the atmosphere.

The Activities
I hired one of my friend's boyfriends who used to do kids parties to provide the entertainment, along with a coloring station (I printed out Minnie Mouse coloring sheets and paired them with Minnie crayons and markers from the $1 section in Michaels) and a temporary tattoo station (this was a surprising hit and gave the au pair that accompanied one of the families something to do). I guess they did the limbo and played with a parachute. I kind of missed that while I was setting up the food.

I bought a Minnie pinata at Party City and the nice thing was that it had the pull strings. My daughter really wanted to smack it with a bat like at the party she went to the day before, but since the rain forced us inside I was happy that no one was bashing down my walls. I did make cute favor bags for the kids to collect the loot in (I'll try to find a photo.)
The kids also played "Pin the Bow on the Minnie," which I made myself. I designed the artwork in Adobe Illustrator the printed it on ledger size paper and mounted it onto black poster board.The bows were a pain to cut out (thanks, Jess!) but I ran them through my Xyron using the re-positionable adhesive and they worked perfectly. I wasn't sure what to use as a blindfold and then happened upon a sleep mask in the dollar section of Michaels that none of the kids complained about putting it on. (Except my kid, who pulled the mask off and totally cheated.)

The Food
We had the regular kind of party snacks out when people got there -- veggie tray with dip, hummus and pita chips, pretzels, and other kinds of chips. Served juice boxes, small (uncustomized -- I just couldn't pull it off!) bottles of water, beer, hard cider and wine. For lunch we had pizza cut into 16 slices each. My husband ordered 10 pizzas which I was convinced was way too much but most of it got eaten!
OK what you really want to know about were the treats, I know. Round 2 of Minnie Mouse cupcakes came out pretty good. This time I made candy bows using pink Wilton candy melts and this bow mold I bought from Amazon. The first tray was a little rough but once I got the hang of it (and realized the mini Oreo ears would cover the ugly backs) it was MUCH faster than the fruit roll-up bow making method. I made two kinds -- pink cupcakes with white frosting and chocolate cupcakes with chocolate frosting. I added white candy sprinkles to the chocolate ones for a little extra detail. Unfortunately either no pictures were taken of the cupcakes before the party or no one has yet shared them with me, so all I have is this photo of the one lone chocolate cupcake left at the end of the party.

I also made Rice Krispy treats. They were all going to be Minnie Mouse heads (well, Mickey, I suppose, as I realized too late that the candy bows I put on the small cupcakes were actually intended for the Rice Krispy treats) but the cookie cutter got too sticky and the mixture too hard so I just rolled it into balls and stuck them on a lollipop stick. They I dunked partially into melted chocolate and threw on some sprinkles. My husband claims I invented Rice Krispy lollipops but I'm guessing someone out there has already made them. Anyway, there were absolutely none left after the party so I guess they were yummy. Even if the display was a rather ghetto piece of plain Styrofoam.

I didn't get to DIY as many things as I planned to and the rain was disappointing but the house looked cute and the birthday girl seemed reasonably happy. I even got to socialize a bit instead of spending the whole time running around like a crazy person. All in all it was a super fun party.
 But next year I'm staying off Pinterest and we're so having it out of the house!
I was too busy running the party to take pics so thankfully my daughter's sitter stepped in and snapped away with my camera. Unfortunately she didn't really know how to use it so the shots aren't that great, but I think you'll get the idea. I am a little bummed that the fantastic work of my super talented sister-in-law wasn't documented well, but you can check out her blog at www.eventsthatsparkle.net.
The Decor
So the decor was pretty typical Minnie Mouse Bowtique party. Lots of pink and black and polka-dots. I got some ideas online (check out my Pinterest Board). I made a cute sign for the door but apparently no photos were taken of it. My sister-in-law put these adorable paper lanterns from Oriental Trading Company up on our living room ceiling, which took more time that anticipated but was so worth it. I may keep them up permanently, they are so cute (although this is a bad photo)!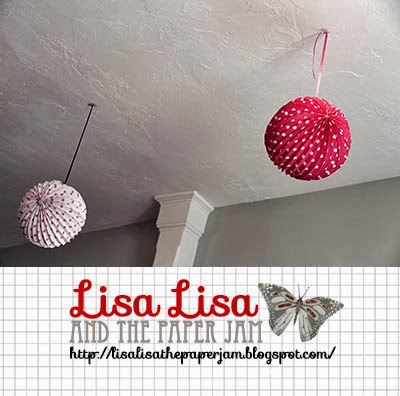
My SIL made this SUPER CUTE Minnie Mouse using Styrofoam balls. This photo doesn't do it justice. She also ordered this banner off of Etsy that we hung over our mantle and we were both annoyed because we knew we could have made it ourselves if only our craft supplies were anywhere to be found.

I also bought this huge Minnie sign at Party City that we planned to put on our fence and use as a photo booth but we ended up just attaching it to the wall. My daughter was one of the few kids that was (surprisingly) cooperative about having her photo taken. As my SIL said, it was pretty cheezy but it did add to the atmosphere.

The Activities
I hired one of my friend's boyfriends who used to do kids parties to provide the entertainment, along with a coloring station (I printed out Minnie Mouse coloring sheets and paired them with Minnie crayons and markers from the $1 section in Michaels) and a temporary tattoo station (this was a surprising hit and gave the au pair that accompanied one of the families something to do). I guess they did the limbo and played with a parachute. I kind of missed that while I was setting up the food.

I bought a Minnie pinata at Party City and the nice thing was that it had the pull strings. My daughter really wanted to smack it with a bat like at the party she went to the day before, but since the rain forced us inside I was happy that no one was bashing down my walls. I did make cute favor bags for the kids to collect the loot in (I'll try to find a photo.)
The kids also played "Pin the Bow on the Minnie," which I made myself. I designed the artwork in Adobe Illustrator the printed it on ledger size paper and mounted it onto black poster board.The bows were a pain to cut out (thanks, Jess!) but I ran them through my Xyron using the re-positionable adhesive and they worked perfectly. I wasn't sure what to use as a blindfold and then happened upon a sleep mask in the dollar section of Michaels that none of the kids complained about putting it on. (Except my kid, who pulled the mask off and totally cheated.)

The Food
We had the regular kind of party snacks out when people got there -- veggie tray with dip, hummus and pita chips, pretzels, and other kinds of chips. Served juice boxes, small (uncustomized -- I just couldn't pull it off!) bottles of water, beer, hard cider and wine. For lunch we had pizza cut into 16 slices each. My husband ordered 10 pizzas which I was convinced was way too much but most of it got eaten!
OK what you really want to know about were the treats, I know. Round 2 of Minnie Mouse cupcakes came out pretty good. This time I made candy bows using pink Wilton candy melts and this bow mold I bought from Amazon. The first tray was a little rough but once I got the hang of it (and realized the mini Oreo ears would cover the ugly backs) it was MUCH faster than the fruit roll-up bow making method. I made two kinds -- pink cupcakes with white frosting and chocolate cupcakes with chocolate frosting. I added white candy sprinkles to the chocolate ones for a little extra detail. Unfortunately either no pictures were taken of the cupcakes before the party or no one has yet shared them with me, so all I have is this photo of the one lone chocolate cupcake left at the end of the party.

I also made Rice Krispy treats. They were all going to be Minnie Mouse heads (well, Mickey, I suppose, as I realized too late that the candy bows I put on the small cupcakes were actually intended for the Rice Krispy treats) but the cookie cutter got too sticky and the mixture too hard so I just rolled it into balls and stuck them on a lollipop stick. They I dunked partially into melted chocolate and threw on some sprinkles. My husband claims I invented Rice Krispy lollipops but I'm guessing someone out there has already made them. Anyway, there were absolutely none left after the party so I guess they were yummy. Even if the display was a rather ghetto piece of plain Styrofoam.

I didn't get to DIY as many things as I planned to and the rain was disappointing but the house looked cute and the birthday girl seemed reasonably happy. I even got to socialize a bit instead of spending the whole time running around like a crazy person. All in all it was a super fun party.

Thursday, September 19, 2013
Birthday stuff
So we moved. Exactly a month ago. The new house is awesome. So much bigger, so much nicer and we're really loving the neighborhood. One thing that I really don't love is that the room that's supposed to be my new craft studio is not finished! It's a big semi-finished attic and it needs a panel to be put in to cover a big hole in the wall. Something about access to the heating panel if I recall correctly. I know the workers will likely make a big mess so I have been waiting setting up the room, but now it's been a month and I am getting itchy to craft!
The other problem is that all of the boxes somehow ended up in the wrong place. I felt like like I clearly labeled everything "craft room" that I wanted up on the third floor and wrote "office" on those that I wanted in my little alcove office that I made behind the fireplace. But yet the complete opposite was done. I have slowly been getting everything into the right room, but some of the boxes are heavy! You don't realize how much 12 X 12 paper weighs until you put hundreds of sheets together in a box...
Anyway, this is my main excuse for not having posted in a month. The move. The unpacking. The general disorder. But there's also another reason -- my daughter's third birthday! She officially turned three a few days ago but her birthday party is this weekend. I feel a little badly that it's definitely going to be smaller in scale that last year's party (although with double the guests -- how did that happen?) For last year's rainbow themed soiree I designed a super cute printed invitation in Photoshop:
 I did all kinds of extra projects like customized water bottles:

And sippy cups with each kid's name on them:

UPDATED 9/30/13: I just discovered that you can see all of the details from last year on my sister-in-law's blog at www.eventsthatsparkle.net!
This year we've got a Minnie's Bowtique themed birthday party and I did design the invitation, although I sent it out electronically because I was running out of time:

I'm fancying up the treat bags and making Minnie cupcakes but that's about it. I did a trial run of the cupcakes for my daughter's preschool class, but it was before the bow mold I ordered from Amazon arrived and I couldn't find mini Oreos in the store so I improvised with chocolate candy melts and bow made out of strawberry fruit roll ups. They came out super cute but the bows were pretty labor intensive (that stuff is STICKY!) so I'm hoping bow made out of candy melts is a little easier. The party is in two days and I'll keep you posted!

The other problem is that all of the boxes somehow ended up in the wrong place. I felt like like I clearly labeled everything "craft room" that I wanted up on the third floor and wrote "office" on those that I wanted in my little alcove office that I made behind the fireplace. But yet the complete opposite was done. I have slowly been getting everything into the right room, but some of the boxes are heavy! You don't realize how much 12 X 12 paper weighs until you put hundreds of sheets together in a box...
Anyway, this is my main excuse for not having posted in a month. The move. The unpacking. The general disorder. But there's also another reason -- my daughter's third birthday! She officially turned three a few days ago but her birthday party is this weekend. I feel a little badly that it's definitely going to be smaller in scale that last year's party (although with double the guests -- how did that happen?) For last year's rainbow themed soiree I designed a super cute printed invitation in Photoshop:

And sippy cups with each kid's name on them:

UPDATED 9/30/13: I just discovered that you can see all of the details from last year on my sister-in-law's blog at www.eventsthatsparkle.net!
This year we've got a Minnie's Bowtique themed birthday party and I did design the invitation, although I sent it out electronically because I was running out of time:

I'm fancying up the treat bags and making Minnie cupcakes but that's about it. I did a trial run of the cupcakes for my daughter's preschool class, but it was before the bow mold I ordered from Amazon arrived and I couldn't find mini Oreos in the store so I improvised with chocolate candy melts and bow made out of strawberry fruit roll ups. They came out super cute but the bows were pretty labor intensive (that stuff is STICKY!) so I'm hoping bow made out of candy melts is a little easier. The party is in two days and I'll keep you posted!

Friday, July 12, 2013
Kids' birthday cards
My daughter has also been invited to a lot of birthday parties lately
and I've been trying to make a quick card for each kid. I've really been
loving making strips of patterned paper into banners. It's fast, colorful and uses up those scraps that I always feel guilty about throwing away.
TIP: I used a square punch to make the triangular portion of the banner. You can use any size square punch as long as it's bigger than your paper strip. Just feed end of the strip through the punch, held diagonally, so you cut off a symmetrical triangle shape. So much easier than using scissors or a craft knife!
Please pardon my photography -- my scanner has been on the fritz so I photographed the cards and I don't have any kind of professional setup for card photography.
A cute first birthday card using primary colors:

I stamped the elephant directly onto the card using Charcoal Colorbox chalk ink, then drew the string of the balloon. The hat I cut freehand from patterned paper and for the balloon I used a circle punch, then inked the edges. I cut out the 1 using my Cricut and used that ever-popular Fiskars scallop sentiment punch to make the ground the elephant stands on. After cutting and assembling the banner strips, I stamped the birthday boy's name.

A horizontal variation, this one totally girlie. I'm sure you can see the influence of the first card on this one! Instead of the elephant I stamped with Charcoal chalk ink (as you can see, it's one of my favorite inks!) a large sentiment that I decorated with dots of clear Stickles. Instead of stamping directly on the card, I used a white panel and attached that to an aqua card base. I was able to wrap a piece of pink ribbon around the white panel this way (I hate for the ribbon ends to be seen in the inside of the card -- pet peeve). I stamped the birthday girl's name on white card stock and punched out the letters with a small circle punch, then attached them with pop dots. I added a Prima flower and of course a gem because this was for a very girlie two-year-old. I also embellished the designs on the patterned papers with additional Stickles, because you can never have too much glitter, right?!
TIP: I used a square punch to make the triangular portion of the banner. You can use any size square punch as long as it's bigger than your paper strip. Just feed end of the strip through the punch, held diagonally, so you cut off a symmetrical triangle shape. So much easier than using scissors or a craft knife!
Please pardon my photography -- my scanner has been on the fritz so I photographed the cards and I don't have any kind of professional setup for card photography.
A cute first birthday card using primary colors:
I stamped the elephant directly onto the card using Charcoal Colorbox chalk ink, then drew the string of the balloon. The hat I cut freehand from patterned paper and for the balloon I used a circle punch, then inked the edges. I cut out the 1 using my Cricut and used that ever-popular Fiskars scallop sentiment punch to make the ground the elephant stands on. After cutting and assembling the banner strips, I stamped the birthday boy's name.
A horizontal variation, this one totally girlie. I'm sure you can see the influence of the first card on this one! Instead of the elephant I stamped with Charcoal chalk ink (as you can see, it's one of my favorite inks!) a large sentiment that I decorated with dots of clear Stickles. Instead of stamping directly on the card, I used a white panel and attached that to an aqua card base. I was able to wrap a piece of pink ribbon around the white panel this way (I hate for the ribbon ends to be seen in the inside of the card -- pet peeve). I stamped the birthday girl's name on white card stock and punched out the letters with a small circle punch, then attached them with pop dots. I added a Prima flower and of course a gem because this was for a very girlie two-year-old. I also embellished the designs on the patterned papers with additional Stickles, because you can never have too much glitter, right?!
Tuesday, October 20, 2009
Quick Girly Card
Today's card was such a rush job and I thought I was going to hate it but I think the Making Memories Glitter Glaze turned it around in the end! I read to a public school student once a week at lunchtime through the Everybody Wins! Power Lunch program. I had my session with her this morning and realized last night at like 8:00 that her birthday was yesterday. We are not supposed to buy the students presents as they are supposed to learn to value the time we spend together reading but we are encouraged to give them cards so I like to make her a little something pretty. I know I would have loved this when I was 10!
 This card was an inexpensive endeavor for me since the white CS was leftover from my wedding invitations and the pink, lavender and flowered papers were from a scrapbook page that I am still finishing up. The flower center and sentiment embellishments are just a circle punch from the pink CS with one of the many purple gems I got at the Christmas Tree shop for like $1. The letters in the name aren't stickers as they appear but the same letter stamps I used on the last cards I made. The Glitter Glaze I brushed onto the cardstock was an after-thought but I love it! Really hard to see in the scan but it looks go nice and girly in person.
Directions: Trim cardstock to 4.25 by 5.5 inch bottom-opening card. Brush with glitter glaze and let dry. Scallop the edge of pp and pink strips. Trim pp to cover about 1/3 of the card and pink CS to matte underneath. Stamp letters on lavender CS with Wisteria ink and cut each one out. Glue top edges to back of bottom of layered papers. Adhere entire piece to card. Punch lavender CS with word tag punch and stamp top tag with birthday sentiment (save other tags for future project). Attach to card and trim excess. Layer flowers and attach to card with glue dots. Punch two 1/4 circles from hot pink CS. Layer with gems and attach to flower center and edge of sentiment tag.
Supplies: White & lavender cardstock, DCWV Spring Glitter Stack hot pink CS and flowered pp, Studio G birthday stamp, small alpha stamps, Prima flowers, adhesive gems, Fiskars Scallop Sentiment border punch, circle hole punch, McGill retro word tags punch, Wisteria chalk ink, Making Memories Glitter Glaze, Zots glue dots
 This card was an inexpensive endeavor for me since the white CS was leftover from my wedding invitations and the pink, lavender and flowered papers were from a scrapbook page that I am still finishing up. The flower center and sentiment embellishments are just a circle punch from the pink CS with one of the many purple gems I got at the Christmas Tree shop for like $1. The letters in the name aren't stickers as they appear but the same letter stamps I used on the last cards I made. The Glitter Glaze I brushed onto the cardstock was an after-thought but I love it! Really hard to see in the scan but it looks go nice and girly in person.
Directions: Trim cardstock to 4.25 by 5.5 inch bottom-opening card. Brush with glitter glaze and let dry. Scallop the edge of pp and pink strips. Trim pp to cover about 1/3 of the card and pink CS to matte underneath. Stamp letters on lavender CS with Wisteria ink and cut each one out. Glue top edges to back of bottom of layered papers. Adhere entire piece to card. Punch lavender CS with word tag punch and stamp top tag with birthday sentiment (save other tags for future project). Attach to card and trim excess. Layer flowers and attach to card with glue dots. Punch two 1/4 circles from hot pink CS. Layer with gems and attach to flower center and edge of sentiment tag.
Supplies: White & lavender cardstock, DCWV Spring Glitter Stack hot pink CS and flowered pp, Studio G birthday stamp, small alpha stamps, Prima flowers, adhesive gems, Fiskars Scallop Sentiment border punch, circle hole punch, McGill retro word tags punch, Wisteria chalk ink, Making Memories Glitter Glaze, Zots glue dots
Thursday, October 15, 2009
Still Stuck on Pink
What can I say? I seem to be stuck on pink lately! Well possibly because now I have a bunch of pink scraps on my desk since I haven't cleaned it off since my other projects.
 This card is for my friend Kristina whose birthday is actually today but I am a bit late in the mailing. It's a bit of an odd size, slightly smaller than 5 by 7, but is is going in a box anyway. It is going to be sent with a hat and scarf that I knitted for her in this soft variegated-blue suede yarn and a pair of red, silver and black earrings with a matching bracelet that I also made. Yes pictures of these items would be nice but really I barely had time to finish them, never-mind photograph them!
I am not sure that I am loving the blue on this card but I thought it sort of went with the scarf. I also think maybe I overdid it with all of the gems AND the Stickles. Oh well, it was really late when I finished it last night so I can't claim it is my best work but hopefully she will like it.
One cool technique I did discover was that my black India ink pad stamps really well on coated cardstock and looks fabulous with this reversed alphabet (meaning the stamp makes the background and the letters stay the color of the paper). I think it will make me use this alpha more often!
Directions:
Cut card to 5 by 7 side-opening and scallop the right edge of the front panel. Trim strips of patterned paper to 4.5 inches wide and approximate heights as shown. Wrap ribbon around pink panel and tie bow around the ribbon. Attach all strips to card, aligning with the fold. Glue strip of black pp inside the card front so it shows behind the scalloped edge. Punch scalloped circles from black & pink pp and layer with foam flowers. Top with rhinestone flower and tiny clear gem. Die-cut swirls from white CS using Slice. Position above and below flower embellie on blue panel. Slide corsage pink through the bow and into small foam flower. Top flower with small clear gem. Stamp name with alphabet stamps using black ink on glossy CS. Cut out individual letters and attach. Edge strip of black dotted pp with upper crest punch. Attach tiny gem in each "valley." Apply Stickles to ends of each swirl.
Supplies:
Strips of patterned papers left over from other projects (bottom pink strip is DCWV Summer stack, blue is Target $1 spot, white swirl I stamped -- see the previous post, pink strip is cut from a gift bag), black & white ribbon, white cardstock, Icicle Stickles, foam flowers from kid's craft dept, corsage pink, letter stamps, rhinestone flower, tiny gems, Slice, Fiskars Scallop Sentiment & Upper Crest punches, Marvy scallop circle punches, Xyron
 This card is for my friend Kristina whose birthday is actually today but I am a bit late in the mailing. It's a bit of an odd size, slightly smaller than 5 by 7, but is is going in a box anyway. It is going to be sent with a hat and scarf that I knitted for her in this soft variegated-blue suede yarn and a pair of red, silver and black earrings with a matching bracelet that I also made. Yes pictures of these items would be nice but really I barely had time to finish them, never-mind photograph them!
I am not sure that I am loving the blue on this card but I thought it sort of went with the scarf. I also think maybe I overdid it with all of the gems AND the Stickles. Oh well, it was really late when I finished it last night so I can't claim it is my best work but hopefully she will like it.
One cool technique I did discover was that my black India ink pad stamps really well on coated cardstock and looks fabulous with this reversed alphabet (meaning the stamp makes the background and the letters stay the color of the paper). I think it will make me use this alpha more often!
Directions:
Cut card to 5 by 7 side-opening and scallop the right edge of the front panel. Trim strips of patterned paper to 4.5 inches wide and approximate heights as shown. Wrap ribbon around pink panel and tie bow around the ribbon. Attach all strips to card, aligning with the fold. Glue strip of black pp inside the card front so it shows behind the scalloped edge. Punch scalloped circles from black & pink pp and layer with foam flowers. Top with rhinestone flower and tiny clear gem. Die-cut swirls from white CS using Slice. Position above and below flower embellie on blue panel. Slide corsage pink through the bow and into small foam flower. Top flower with small clear gem. Stamp name with alphabet stamps using black ink on glossy CS. Cut out individual letters and attach. Edge strip of black dotted pp with upper crest punch. Attach tiny gem in each "valley." Apply Stickles to ends of each swirl.
Supplies:
Strips of patterned papers left over from other projects (bottom pink strip is DCWV Summer stack, blue is Target $1 spot, white swirl I stamped -- see the previous post, pink strip is cut from a gift bag), black & white ribbon, white cardstock, Icicle Stickles, foam flowers from kid's craft dept, corsage pink, letter stamps, rhinestone flower, tiny gems, Slice, Fiskars Scallop Sentiment & Upper Crest punches, Marvy scallop circle punches, Xyron
Friday, October 9, 2009
Pretty in Pink
 I have two new cards for you today! Both of them are pink, which seems odd, considering it's October. The first one is a birthday card for my friend Katie. It's a bit of a takeoff on the last birthday card I posted. I bought her two books (craft cozies -- knitting fiction!) for her birthday and the gift bag I used was black, white and hot pink with dots and swirls. I'm not sure that these are really her colors, but I figured I'd make a card to match. We are going out to dinner tonight and I am excited to see her reaction.
I recently mentioned to Katie that I had crocheted some small flowers to use on cards and scrapbook pages and she said she hoped her birthday card would include one of the flowers, since we often "Stitch 'n' Bitch" together. I didn't use a birthday sentiment on the outside because I know she is sentimental and will probably keep the card, and this way she can put it in a frame if she wants. The card is 7 by 5 inches. I was excited to find in my stash the pink dotted flower but had the hardest time figuring out how to use it. I was happy to finally use some of the black flock that JoAnn's sent me (four containers instead of one!)
Directions
Cut white card to 7 by 5 bottom opening card. Stamp swirls repeatedly on white coated cardstock with black Staz On. Let dry. Trim, along with three other patterned papers, into 1.5 by 5 inch strips and attach to card. Use Treading Water punch along bottom of front panel of card. Trim black paper to 2 by 6 and round the corners on one end. Pierce holes around the edges and draw stitching lines with white gel pen. Wrap pink ribbon around bottom and tie bow. Die cut swirls from black paper and letters from white cardstock using Slice. Run through Xyron and then brush with glitter glaze while still attached to backing. Let dry. Attach letters to black panel. Attach panel to right bottom. Punch scalloped circle from white cardstock. Apply glue rub-on and cover with flock. Press in and then brush off excess. Attach pink silk flower and white crochet flower with crystal brad. Attach to card with foam squares. Attach swirls to card, applying gems to the ends. Attach flower gem to dot "i" with small glue dots.
Supplies
White cardstock, white glossy cardstock, scrap black glossy paper, DCWV Summer Glitter Stack pink patterned papers, unknown black dotted paper; Inkadinkado and Autumn Leaves swirl stamps; Black Staz On ink; Marvy scalloped circle, Fiskars Treading Water punches; K&Co (?) rub-ons for flocking; Black Stampendous flock; Slice die-cutting machine; White Stabilo gel pen; Making Memories clear glitter glaze; Xyron adhesive machine; Pink silk flower (from JoAnn's but unsure of brand); Crochet flower (I made it!); Offray ribbon; Making Memories crystal brad; Pink self-adhesive round and flower gems (unknown); foam squares; Zots glue dot
The second card is rather like the one I made for my husband's grandmother's 80th birthday, but I forgot to scan or photograph that one before I gave it to her, so I somewhat recreated it for my stash. What I like best is that I cut around the stamped butterfly wings, leaving the body attached, so the wings fold out from the card. I also messed up and forgot to add the stitching before I glued down the pink and flowered papers, so I cut a strip and attached it behind my scalloped edge to cover the stitching inside. Awkward to explain, but it looks really good, especially since it it two-sided paper so the flowered pattern make a border on the inside.

Directions
Trim ivory cardstock to 5 by 7 inch side-opening card. Scallop the edge of the front panel of card with border punch. Stamp butterfly on pink paper with brown ink. Trim around wings, leaving body attached and fold wings out. Stamp leaves below butterfly. Trim to fit, leaving scalloped edge showing, and attach to top half of card. Trim flowered paper, wrap lace around and attach to bottom of card. Stitch along edge. Trim strip of green paper (opposite side of flowered paper) to about 1 inch by 7 inches and attach to inside edge of card to cover up stitching. Layer pink Prima on cream one and attach to card with glue dots. Attach flower gem with glue dots. Attach pearls and pink gem to body of butterfly.
Supplies
Ivory cardstock; Pink SCWV paper; K&Co. Brenda Walton flowered paper; Lace scrap; Prima flowers; K&Co. butterfly stamp; Chestnut Roan and Olive Pastel Colorbox Chalk Inks; DMC brown embroidery floss; Fiskars border punch; Flower gem (unknown); adhesive pearls and pink gem (Nicole?); Zots glue dot
Friday, October 2, 2009
World Card Making Day is Tomorrow
Saturday, October 3 is World Card Making Day. I wish I could report that I have some kind of exciting plans, but I thought I had a conflict with a family event so I didn't schedule anything. Nonetheless, I'm planning to make three birthday cards tomorrow in my craft studio. I'm excited to use some new supplies that I picked up at an odd place -- the Christmas Tree Shop! Enabler alert: They have Martha Stewart punches for $3.99. Only two styles at my store but yours may have more!
I'll be sure to post my creations over the weekend or next week, but I wanted to leave you with some cards I made a few weeks ago to rev up my inspiration.

This first one was for my niece's 8th birthday so I made sure to use lots of pink and a little bling. I made the flower embellishment on the left side actually extends off of the card, so the card base is only 5.25 inches wide, allowing it to fit in a standard size envelope. The letters were made using my Slice, which I haven't been using enough. I brushed Stickles all over them to give them a bit of shine.
Card directions
1. Trim white cardstock to 5.25 by 8.5 and fold in half so the opening is at the bottom.
2. Trim flowered patterned paper to 5.25 by 4 and attach to card so .125 inch shows at top and bottom.
3. Die cut letters from white cardstock using Slice. Brush with Stickles and let dry.
4. Trim pink patterned paper strip so that it is taller than your letters and ink the top edge with brown ink.
6. Edge strip of white cardstock with scalloped border punch and attach edge to back of pink strip.
7. Wrap ribbon around seam and tie knot.
8. Stamp sentiment with brown ink on white cardstock and trim, round top corners, ink edges and attach edge to back of pink strip.
9. Attach pink strip section to middle third of card.
10. Glue on letters, leaving room for the flower embellishment.
12. Punch scalloped circle from white cardstock.
13. Punch flower from patterned paper scrap with circle punch and attach to white scalloped circle with foam tape.
14. Cut leaves from patterned paper scrap and attach to flower circle.
15. Spread stickles on flower and adhere gem to center.
16. Attach flower so that it overhangs the edge of the card by .25 inch.
Supplies
Paper: White cardstock, DCWV Summer Glitter stack patterned paper
Stamp: Studio G
Ink: Colorbox Chalk Chestnut Roan
Ribbon: Target
Punches: Fiskars Treading Water, EK Success scalloped circle and corner rounder.
Die cut letters: Making Memories Slice limited edition Seasons card
Gem: Nicole
Glitter: Stickles either Diamond or Crystal
The second card was for my Mom's birthday, only ten days after my niece's. This one is a similar design, with the scalloped circle flower extending off the right side, but with a more muted color palette. The little butterfly and staples give some added dimension.
 Card directions
1. Trim ivory cardstock to 10.5 by 4.25 and fold to make a side opening card.
2. Trim blue cardstock to 5 by 4 and adhere.
3. Trim flower paper to 4.75 by 3.75, ink edges with pink and adhere.
4. Punch pink strip with border punch.
5. Trim strip of striped paper and adhere to pink strip.
6. Wrap rickrack around seam.
7. Attach pink strip.
8. Stamp sentiments on ivory carstock with purple ink and ink edges with pink.
9. Attach sentiments as shown, using staples on ends of bottom sentiment.
10. Punch butterfly from purple scrap cardstock. Fold in half, open and attach with staple.
12. Punch scalloped circle from blue cardstock and dot scallops with silver gel pen.
11. Punch circle from ivory cardstock and draw circle with template and silver gel pen. Attach to blue circle.
12. Punch three sizes of flowers and attach with foam tape to each other and ivory circle.
13. Finish flower with adhesive pearl.
Supplies
Paper: Ivory and light blue cardstock, scraps of pink and purple cardstock, Making Memories (floral print and stripes), DCWV (pink swirled)
Stamps: PSX (alpha), K&Co. (birthday sentiment)
Ink: Colorbox Chalk Wisteria and Pink Pastel
Punches: EK Success flower and butterfly punches, Martha Stewart border punch
Rickrack: Offray
Staples
Pen: Silver Uniball Gel Extreme
Pearl: K&Co
I'll be sure to post my creations over the weekend or next week, but I wanted to leave you with some cards I made a few weeks ago to rev up my inspiration.

This first one was for my niece's 8th birthday so I made sure to use lots of pink and a little bling. I made the flower embellishment on the left side actually extends off of the card, so the card base is only 5.25 inches wide, allowing it to fit in a standard size envelope. The letters were made using my Slice, which I haven't been using enough. I brushed Stickles all over them to give them a bit of shine.
Card directions
1. Trim white cardstock to 5.25 by 8.5 and fold in half so the opening is at the bottom.
2. Trim flowered patterned paper to 5.25 by 4 and attach to card so .125 inch shows at top and bottom.
3. Die cut letters from white cardstock using Slice. Brush with Stickles and let dry.
4. Trim pink patterned paper strip so that it is taller than your letters and ink the top edge with brown ink.
6. Edge strip of white cardstock with scalloped border punch and attach edge to back of pink strip.
7. Wrap ribbon around seam and tie knot.
8. Stamp sentiment with brown ink on white cardstock and trim, round top corners, ink edges and attach edge to back of pink strip.
9. Attach pink strip section to middle third of card.
10. Glue on letters, leaving room for the flower embellishment.
12. Punch scalloped circle from white cardstock.
13. Punch flower from patterned paper scrap with circle punch and attach to white scalloped circle with foam tape.
14. Cut leaves from patterned paper scrap and attach to flower circle.
15. Spread stickles on flower and adhere gem to center.
16. Attach flower so that it overhangs the edge of the card by .25 inch.
Supplies
Paper: White cardstock, DCWV Summer Glitter stack patterned paper
Stamp: Studio G
Ink: Colorbox Chalk Chestnut Roan
Ribbon: Target
Punches: Fiskars Treading Water, EK Success scalloped circle and corner rounder.
Die cut letters: Making Memories Slice limited edition Seasons card
Gem: Nicole
Glitter: Stickles either Diamond or Crystal
The second card was for my Mom's birthday, only ten days after my niece's. This one is a similar design, with the scalloped circle flower extending off the right side, but with a more muted color palette. The little butterfly and staples give some added dimension.
 Card directions
1. Trim ivory cardstock to 10.5 by 4.25 and fold to make a side opening card.
2. Trim blue cardstock to 5 by 4 and adhere.
3. Trim flower paper to 4.75 by 3.75, ink edges with pink and adhere.
4. Punch pink strip with border punch.
5. Trim strip of striped paper and adhere to pink strip.
6. Wrap rickrack around seam.
7. Attach pink strip.
8. Stamp sentiments on ivory carstock with purple ink and ink edges with pink.
9. Attach sentiments as shown, using staples on ends of bottom sentiment.
10. Punch butterfly from purple scrap cardstock. Fold in half, open and attach with staple.
12. Punch scalloped circle from blue cardstock and dot scallops with silver gel pen.
11. Punch circle from ivory cardstock and draw circle with template and silver gel pen. Attach to blue circle.
12. Punch three sizes of flowers and attach with foam tape to each other and ivory circle.
13. Finish flower with adhesive pearl.
Supplies
Paper: Ivory and light blue cardstock, scraps of pink and purple cardstock, Making Memories (floral print and stripes), DCWV (pink swirled)
Stamps: PSX (alpha), K&Co. (birthday sentiment)
Ink: Colorbox Chalk Wisteria and Pink Pastel
Punches: EK Success flower and butterfly punches, Martha Stewart border punch
Rickrack: Offray
Staples
Pen: Silver Uniball Gel Extreme
Pearl: K&Co
Subscribe to:
Posts (Atom)