Well Valentine's Day was almost two weeks ago but I'm just getting around to looking at our photos from that week and it occurred to me that I should share the super cute valentines that I made for my daughter to hand out to her schoolmates. I thought she would want to paint or draw something but that didn't seem to be happening so instead I had her help me make these.
They were totally inspired by several that I saw on Pinterest. None of them were quite what I had in mind so I designed my own printable. This really couldn't have been any easier or inexpensive -- print, cut, punch holes, poke glow stick through. I bought the glow bracelets at Michaels, last summer I believe. I think there were 15 in the tube and it cost $1.
We decided to write the kids names and use some pink glitter glue on the heart, but neither is really necessary. You or your kids could color in the letters or decorate in some other way. My daughter chose to make a few half-hearted scribbles on the back.
I made a printable that you and your child can personalize -- feel free to download it and use it for your valentines next year!
Download valentine printable
Showing posts with label Michaels. Show all posts
Tuesday, February 25, 2014
Monday, September 30, 2013
Minnie Mouse 3rd Birthday Party
Well, the party's been over for a week but my house is still decorated like Minnie Mouse Birthday Land so it can't be too late to post some pics. The party was super fun although I think the guests had more fun than the birthday girl. She was a bit overwhelmed! There ended up being 20 kids. I'm thrilled that she has such a large social circle but it was pretty crazy, especially since it was rainy that morning so we had the party inside. Fortunately we have a large living room where the grownups could socialize and were also able to use the living space in the attached in-law apartment as an "activity room" for the kids.
I was too busy running the party to take pics so thankfully my daughter's sitter stepped in and snapped away with my camera. Unfortunately she didn't really know how to use it so the shots aren't that great, but I think you'll get the idea. I am a little bummed that the fantastic work of my super talented sister-in-law wasn't documented well, but you can check out her blog at www.eventsthatsparkle.net.
My SIL made this SUPER CUTE Minnie Mouse using Styrofoam balls. This photo doesn't do it justice. She also ordered this banner off of Etsy that we hung over our mantle and we were both annoyed because we knew we could have made it ourselves if only our craft supplies were anywhere to be found.
I also bought this huge Minnie sign at Party City that we planned to put on our fence and use as a photo booth but we ended up just attaching it to the wall. My daughter was one of the few kids that was (surprisingly) cooperative about having her photo taken. As my SIL said, it was pretty cheezy but it did add to the atmosphere.
The Activities
I hired one of my friend's boyfriends who used to do kids parties to provide the entertainment, along with a coloring station (I printed out Minnie Mouse coloring sheets and paired them with Minnie crayons and markers from the $1 section in Michaels) and a temporary tattoo station (this was a surprising hit and gave the au pair that accompanied one of the families something to do). I guess they did the limbo and played with a parachute. I kind of missed that while I was setting up the food.
I bought a Minnie pinata at Party City and the nice thing was that it had the pull strings. My daughter really wanted to smack it with a bat like at the party she went to the day before, but since the rain forced us inside I was happy that no one was bashing down my walls. I did make cute favor bags for the kids to collect the loot in (I'll try to find a photo.)
The kids also played "Pin the Bow on the Minnie," which I made myself. I designed the artwork in Adobe Illustrator the printed it on ledger size paper and mounted it onto black poster board.The bows were a pain to cut out (thanks, Jess!) but I ran them through my Xyron using the re-positionable adhesive and they worked perfectly. I wasn't sure what to use as a blindfold and then happened upon a sleep mask in the dollar section of Michaels that none of the kids complained about putting it on. (Except my kid, who pulled the mask off and totally cheated.)
The Food
We had the regular kind of party snacks out when people got there -- veggie tray with dip, hummus and pita chips, pretzels, and other kinds of chips. Served juice boxes, small (uncustomized -- I just couldn't pull it off!) bottles of water, beer, hard cider and wine. For lunch we had pizza cut into 16 slices each. My husband ordered 10 pizzas which I was convinced was way too much but most of it got eaten!
OK what you really want to know about were the treats, I know. Round 2 of Minnie Mouse cupcakes came out pretty good. This time I made candy bows using pink Wilton candy melts and this bow mold I bought from Amazon. The first tray was a little rough but once I got the hang of it (and realized the mini Oreo ears would cover the ugly backs) it was MUCH faster than the fruit roll-up bow making method. I made two kinds -- pink cupcakes with white frosting and chocolate cupcakes with chocolate frosting. I added white candy sprinkles to the chocolate ones for a little extra detail. Unfortunately either no pictures were taken of the cupcakes before the party or no one has yet shared them with me, so all I have is this photo of the one lone chocolate cupcake left at the end of the party.
I also made Rice Krispy treats. They were all going to be Minnie Mouse heads (well, Mickey, I suppose, as I realized too late that the candy bows I put on the small cupcakes were actually intended for the Rice Krispy treats) but the cookie cutter got too sticky and the mixture too hard so I just rolled it into balls and stuck them on a lollipop stick. They I dunked partially into melted chocolate and threw on some sprinkles. My husband claims I invented Rice Krispy lollipops but I'm guessing someone out there has already made them. Anyway, there were absolutely none left after the party so I guess they were yummy. Even if the display was a rather ghetto piece of plain Styrofoam.
I didn't get to DIY as many things as I planned to and the rain was disappointing but the house looked cute and the birthday girl seemed reasonably happy. I even got to socialize a bit instead of spending the whole time running around like a crazy person. All in all it was a super fun party.
But next year I'm staying off Pinterest and we're so having it out of the house!
I was too busy running the party to take pics so thankfully my daughter's sitter stepped in and snapped away with my camera. Unfortunately she didn't really know how to use it so the shots aren't that great, but I think you'll get the idea. I am a little bummed that the fantastic work of my super talented sister-in-law wasn't documented well, but you can check out her blog at www.eventsthatsparkle.net.
The Decor
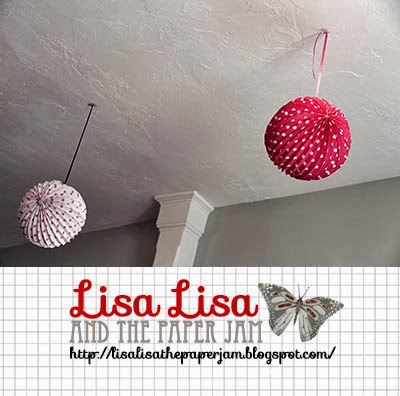
So the decor was pretty typical Minnie Mouse Bowtique party. Lots of pink and black and polka-dots. I got some ideas online (check out my Pinterest Board). I made a cute sign for the door but apparently no photos were taken of it. My sister-in-law put these adorable paper lanterns from Oriental Trading Company up on our living room ceiling, which took more time that anticipated but was so worth it. I may keep them up permanently, they are so cute (although this is a bad photo)!My SIL made this SUPER CUTE Minnie Mouse using Styrofoam balls. This photo doesn't do it justice. She also ordered this banner off of Etsy that we hung over our mantle and we were both annoyed because we knew we could have made it ourselves if only our craft supplies were anywhere to be found.
I also bought this huge Minnie sign at Party City that we planned to put on our fence and use as a photo booth but we ended up just attaching it to the wall. My daughter was one of the few kids that was (surprisingly) cooperative about having her photo taken. As my SIL said, it was pretty cheezy but it did add to the atmosphere.
The Activities
I hired one of my friend's boyfriends who used to do kids parties to provide the entertainment, along with a coloring station (I printed out Minnie Mouse coloring sheets and paired them with Minnie crayons and markers from the $1 section in Michaels) and a temporary tattoo station (this was a surprising hit and gave the au pair that accompanied one of the families something to do). I guess they did the limbo and played with a parachute. I kind of missed that while I was setting up the food.
I bought a Minnie pinata at Party City and the nice thing was that it had the pull strings. My daughter really wanted to smack it with a bat like at the party she went to the day before, but since the rain forced us inside I was happy that no one was bashing down my walls. I did make cute favor bags for the kids to collect the loot in (I'll try to find a photo.)
The kids also played "Pin the Bow on the Minnie," which I made myself. I designed the artwork in Adobe Illustrator the printed it on ledger size paper and mounted it onto black poster board.The bows were a pain to cut out (thanks, Jess!) but I ran them through my Xyron using the re-positionable adhesive and they worked perfectly. I wasn't sure what to use as a blindfold and then happened upon a sleep mask in the dollar section of Michaels that none of the kids complained about putting it on. (Except my kid, who pulled the mask off and totally cheated.)
The Food
We had the regular kind of party snacks out when people got there -- veggie tray with dip, hummus and pita chips, pretzels, and other kinds of chips. Served juice boxes, small (uncustomized -- I just couldn't pull it off!) bottles of water, beer, hard cider and wine. For lunch we had pizza cut into 16 slices each. My husband ordered 10 pizzas which I was convinced was way too much but most of it got eaten!
OK what you really want to know about were the treats, I know. Round 2 of Minnie Mouse cupcakes came out pretty good. This time I made candy bows using pink Wilton candy melts and this bow mold I bought from Amazon. The first tray was a little rough but once I got the hang of it (and realized the mini Oreo ears would cover the ugly backs) it was MUCH faster than the fruit roll-up bow making method. I made two kinds -- pink cupcakes with white frosting and chocolate cupcakes with chocolate frosting. I added white candy sprinkles to the chocolate ones for a little extra detail. Unfortunately either no pictures were taken of the cupcakes before the party or no one has yet shared them with me, so all I have is this photo of the one lone chocolate cupcake left at the end of the party.
I also made Rice Krispy treats. They were all going to be Minnie Mouse heads (well, Mickey, I suppose, as I realized too late that the candy bows I put on the small cupcakes were actually intended for the Rice Krispy treats) but the cookie cutter got too sticky and the mixture too hard so I just rolled it into balls and stuck them on a lollipop stick. They I dunked partially into melted chocolate and threw on some sprinkles. My husband claims I invented Rice Krispy lollipops but I'm guessing someone out there has already made them. Anyway, there were absolutely none left after the party so I guess they were yummy. Even if the display was a rather ghetto piece of plain Styrofoam.
I didn't get to DIY as many things as I planned to and the rain was disappointing but the house looked cute and the birthday girl seemed reasonably happy. I even got to socialize a bit instead of spending the whole time running around like a crazy person. All in all it was a super fun party.
But next year I'm staying off Pinterest and we're so having it out of the house!
Monday, August 5, 2013
Simple (?) layout
Simplicity has never been my forte when it comes to scrapbooking. I generally follow the theory that more is more. Here's a page that uses only five supplies! I'm not sure if I should be proud of myself or concerned that something is missing. It really does feel a little... plain to me. What do you think?
The background is pattered paper from Cosmo Cricket. The flower is a large die cut from K & Co. It inspired the entire page design because it is so big and bold. The title sentiment is also from K & Co, popped up with foam tape. I keep running into sales on K & Co. products at Michaels and AC Moore and I can't help but stock up! The final supply I used was just a pigment pen to add the date in the lower right corner. One of the easiest, peasiest pages I've done in a long time! Really, is it missing something? Maybe in the upper left corner?
Monday, September 14, 2009
Daddy's Girl
OK, really bad blogger I have been. But it was kind of starting to feel like work, with how nice it was outside there for awhile (finally!) and I said that I was out when it started to be too hard.
However I have actually done some scrapbooking lately and I thought I'd share one today. It uses an old photo as I am in a quandary about photo printing. More on that later. First the layout:
This one is me and my dad, as you can see by the cute little Studio G stamp that I used for the subtitle. This is an OLD photo, from 1994, that is in one of the four icky magnetic albums that I am trying to redo. Yes I know I should pull all of the photos out to minimize further damage, but the idea of having to store all of those photos in some organized way or risk having to resort them is too much for me to handle. So I am s-l-o-w-l-y redesigning these pages.
I knew I wanted to use this cute bird background paper from the DCWV Glitter Summer Stack (or is it spring?!) and the cordinating DCWV chipboard flower, which I ended up topping with a blue foam circle and clear gem to minimize the hot pink. Then I found the red vinyl stickers in my stash that I bought last year from Michaels' holiday clearance, figuring they didn't really scream "Christmas." I thought the black Making Memories rub on letters were a nice constrast.
It took me awhile to settle on the b&w polka dotted paper, which has been in my stash forever. I used my newish Fiskars Upper Crest border punch. The photo mat is a randomly a page from a yellow lined hotel notepad that was on my desk. The ribbon was already cut in my ribbon scraps bin, it's $1 kind from Michaels. I added the green dotted Making Memories leaves for a little contrast. The subtitle lable was the only item I used from the large K&Co kit I got at AC Moore, even though I planned to use more of that kit on the page. I stamped it with Staz On using the aforementioned Studio G stamp.
Finally, I though the upper right corner seemed a bit bare so I back-stitched with some black embroidery floss. That made the center seem a little bare so I added the sentiment sticker, the negative from punching the black dotted border and some cross-stitches. Ta da! Nice father-daughter moment captured.
So as to my photo printing quandary, the printer I have does not play nice with Vista and I have no way of knowing how much ink is left. I also think it is just not printing as nicely and I have started wondering how long the pictures are going to last. I thought it was more economical to print myself, and also more freeing since the pictures can be any size. I was also doing a lot of digital scrapbooking so it made sense.
But I am starting to think that for longevity's sake I should get my photos printed professionally. I want to use more of my paper scrapbooking stash and I think this will encourage me to not just default to digital. Also it is taking me so long to think up layouts with different sized photos and I think I am falling into the trap of thinking I need to scrap every photo. Maybe it would be easier to go back to having mostly 4X6s?
I am thinking about checking out www.scrapbookpictures.com but I'm open to suggestions.
However I have actually done some scrapbooking lately and I thought I'd share one today. It uses an old photo as I am in a quandary about photo printing. More on that later. First the layout:
This one is me and my dad, as you can see by the cute little Studio G stamp that I used for the subtitle. This is an OLD photo, from 1994, that is in one of the four icky magnetic albums that I am trying to redo. Yes I know I should pull all of the photos out to minimize further damage, but the idea of having to store all of those photos in some organized way or risk having to resort them is too much for me to handle. So I am s-l-o-w-l-y redesigning these pages.I knew I wanted to use this cute bird background paper from the DCWV Glitter Summer Stack (or is it spring?!) and the cordinating DCWV chipboard flower, which I ended up topping with a blue foam circle and clear gem to minimize the hot pink. Then I found the red vinyl stickers in my stash that I bought last year from Michaels' holiday clearance, figuring they didn't really scream "Christmas." I thought the black Making Memories rub on letters were a nice constrast.
It took me awhile to settle on the b&w polka dotted paper, which has been in my stash forever. I used my newish Fiskars Upper Crest border punch. The photo mat is a randomly a page from a yellow lined hotel notepad that was on my desk. The ribbon was already cut in my ribbon scraps bin, it's $1 kind from Michaels. I added the green dotted Making Memories leaves for a little contrast. The subtitle lable was the only item I used from the large K&Co kit I got at AC Moore, even though I planned to use more of that kit on the page. I stamped it with Staz On using the aforementioned Studio G stamp.
Finally, I though the upper right corner seemed a bit bare so I back-stitched with some black embroidery floss. That made the center seem a little bare so I added the sentiment sticker, the negative from punching the black dotted border and some cross-stitches. Ta da! Nice father-daughter moment captured.
So as to my photo printing quandary, the printer I have does not play nice with Vista and I have no way of knowing how much ink is left. I also think it is just not printing as nicely and I have started wondering how long the pictures are going to last. I thought it was more economical to print myself, and also more freeing since the pictures can be any size. I was also doing a lot of digital scrapbooking so it made sense.
But I am starting to think that for longevity's sake I should get my photos printed professionally. I want to use more of my paper scrapbooking stash and I think this will encourage me to not just default to digital. Also it is taking me so long to think up layouts with different sized photos and I think I am falling into the trap of thinking I need to scrap every photo. Maybe it would be easier to go back to having mostly 4X6s?
I am thinking about checking out www.scrapbookpictures.com but I'm open to suggestions.
Subscribe to:
Posts (Atom)