Sunday, December 15, 2013

Just add alcohol-- Hello Kitty Martini glasses & coasters

The holiday season has been crazy! Chanukah starting the night before Thanksgiving just threw the whole thing off for me this year. I've already been to four holiday parties, with two more scheduled in for this weekend, and it's not even mid-December. Starting to get burnt out already and I've barely made a dent in the shopping list.

One present that is complete (because I need it for today!) is my "Secret Santa" gift for my work holiday party. I was fortunate to get my boss again this year because she is so easy to shop for. She loves Hello Kitty and martinis and was joking around that the perfect gift for her would be a Hello Kitty martini glass so that got me thinking about some glass paints I bought who knows how long ago...

Unfortunately, I never took a photo of the glasses! So annoyed! My boss said she'd take one for me but so far that is not forthcoming. I'll have to remind her again. They are so cute!

Sunday, November 3, 2013

Fastest cards ever

So this weekend was a busy one and the crafting just couldn't take priority. I've been working for months on a fundraiser for a really great organization that I'm on the Board of the Friends for and our big event was Saturday night. I was stuffing grab bags, making luminaries and doing other last minute tasks. But I still like to give handmade birthday cards and my daughter had a party for not just one three-year-old, but two. Consequently, I made two of the fastest birthday cards ever. Literally I slapped them together minutes before we left for the joint party, while my husband took a shower. Totally not my typical style of agonizing over the position of each element but it was rather freeing. Sorry about the abysmal photography -- I took the pictures with my phone in the (moving) car on the way to the party. That dark background is the jeans I was wearing.


The secret to this super fast card design was having 1 inch strips of patterned paper already in my scrap box. I've got tons because as an 8.5 by 11 scrapbooker, I often cut 1 inch off of 12 by 12 papers. I selected three strips that used purple for my daughter's friend Violet and three with oranges for the little girl named Clementine. I stamped some birthday and letter stamps using chalk ink, punched two circles, added scrap ribbon and voila! The stamping is rather messy and not up to my usual standards but I'm thinking three-year-olds won't really notice.

Do you have any tricks for getting cards made fast?

Monday, September 30, 2013

Minnie Mouse 3rd Birthday Party

Well, the party's been over for a week but my house is still decorated like Minnie Mouse Birthday Land so it can't be too late to post some pics. The party was super fun although I think the guests had more fun than the birthday girl. She was a bit overwhelmed! There ended up being 20 kids. I'm thrilled that she has such a large social circle but it was pretty crazy, especially since it was rainy that morning so we had the party inside. Fortunately we have a large living room where the grownups could socialize and were also able to use the living space in the attached in-law apartment as an "activity room" for the kids.

I was too busy running the party to take pics so thankfully my daughter's sitter stepped in and snapped away with my camera. Unfortunately she didn't really know how to use it so the shots aren't that great, but I think you'll get the idea. I am a little bummed that the fantastic work of my super talented sister-in-law wasn't documented well, but you can check out her blog at www.eventsthatsparkle.net.

The Decor
So the decor was pretty typical Minnie Mouse Bowtique party. Lots of pink and black and polka-dots. I got some ideas online (check out my Pinterest Board). I made a cute sign for the door but apparently no photos were taken of it. My sister-in-law put these adorable paper lanterns from 
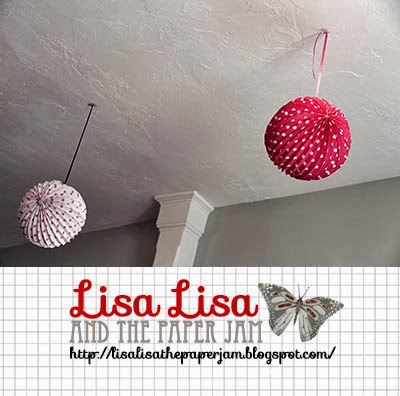
Oriental Trading Company up on our living room ceiling, which took more time that anticipated but was so worth it. I may keep them up permanently, they are so cute (although this is a bad photo)!


My SIL made this SUPER CUTE Minnie Mouse using Styrofoam balls. This photo doesn't do it justice. She also ordered this banner off of Etsy that we hung over our mantle and we were both annoyed because we knew we could have made it ourselves if only our craft supplies were anywhere to be found.


I also bought this huge Minnie sign at Party City that we planned to put on our fence and use as a photo booth but we ended up just attaching it to the wall. My daughter was one of the few kids that was (surprisingly) cooperative about having her photo taken. As my SIL said, it was pretty cheezy but it did add to the atmosphere.


The Activities
I hired one of my friend's boyfriends who used to do kids parties to provide the entertainment, along with a coloring station (I printed out Minnie Mouse coloring sheets and paired them with Minnie crayons and markers from the $1 section in Michaels) and a temporary tattoo station (this was a surprising hit and gave the au pair that accompanied one of the families something to do). I guess they did the limbo and played with a parachute. I kind of missed that while I was setting up the food.


I bought a Minnie pinata at Party City and the nice thing was that it had the pull strings. My daughter really wanted to smack it with a bat like at the party she went to the day before, but since the rain forced us inside I was happy that no one was bashing down my walls. I did make cute favor bags for the kids to collect the loot in (I'll try to find a photo.)

The kids also played "Pin the Bow on the Minnie," which I made myself. I designed the artwork in Adobe Illustrator the printed it on ledger size paper and mounted it onto black poster board.The bows were a pain to cut out (thanks, Jess!) but I ran them through my Xyron using the re-positionable adhesive and they worked perfectly. I wasn't sure what to use as a blindfold and then happened upon a sleep mask in the dollar section of Michaels that none of the kids complained about putting it on. (Except my kid, who pulled the mask off and totally cheated.)


The Food
We had the regular kind of party snacks out when people got there --  veggie tray with dip, hummus and pita chips, pretzels, and other kinds of chips. Served juice boxes, small (uncustomized -- I just couldn't pull it off!) bottles of water, beer, hard cider and wine. For lunch we had pizza cut into 16 slices each. My husband ordered 10 pizzas which I was convinced was way too much but most of it got eaten!

OK what you really want to know about were the treats, I know. Round 2 of Minnie Mouse cupcakes came out pretty good. This time I made candy bows using pink Wilton candy melts and this bow mold I bought from Amazon. The first tray was a little rough but once I got the hang of it (and realized the mini Oreo ears would cover the ugly backs) it was MUCH faster than the fruit roll-up bow making method. I made two kinds -- pink cupcakes with white frosting and chocolate cupcakes with chocolate frosting. I added white candy sprinkles to the chocolate ones for a little extra detail. Unfortunately either no pictures were taken of the cupcakes before the party or no one has yet shared them with me, so all I have is this photo of the one lone chocolate cupcake left at the end of the party.


I also made Rice Krispy treats. They were all going to be Minnie Mouse heads (well, Mickey, I suppose, as I realized too late that the candy bows I put on the small cupcakes were actually intended for the Rice Krispy treats) but the cookie cutter got too sticky and the mixture too hard so I just rolled it into balls and stuck them on a lollipop stick. They I dunked partially into melted chocolate and threw on some sprinkles. My husband claims I invented Rice Krispy lollipops but I'm guessing someone out there has already made them. Anyway, there were absolutely none left after the party so I guess they were yummy. Even if the display was a rather ghetto piece of plain Styrofoam.


I didn't get to DIY as many things as I planned to and the rain was disappointing but the house looked cute and the birthday girl seemed reasonably happy. I even got to socialize a bit instead of spending the whole time running around like a crazy person. All in all it was a super fun party.

But next year I'm staying off Pinterest and we're so having it out of the house!

Thursday, September 19, 2013

Birthday stuff

So we moved. Exactly a month ago. The new house is awesome. So much bigger, so much nicer and we're really loving the neighborhood. One thing that I really don't love is that the room that's supposed to be my new craft studio is not finished! It's a big semi-finished attic and it needs a panel to be put in to cover a big hole in the wall. Something about access to the heating panel if I recall correctly. I know the workers will likely make a big mess so I have been waiting setting up the room, but now it's been a month and I am getting itchy to craft!

The other problem is that all of the boxes somehow ended up in the wrong place. I felt like like I clearly labeled everything "craft room" that I wanted up on the third floor and wrote "office" on those that I wanted in my little alcove office that I made behind the fireplace. But yet the complete opposite was done. I have slowly been getting everything into the right room, but some of the boxes are heavy! You don't realize how much 12 X 12 paper weighs until you put hundreds of sheets together in a box...

Anyway, this is my main excuse for not having posted in a month. The move. The unpacking. The general disorder. But there's also another reason -- my daughter's third birthday! She officially turned three a few days ago but her birthday party is this weekend. I feel a little badly that it's definitely going to be smaller in scale that last year's party (although with double the guests -- how did that happen?) For last year's rainbow themed soiree I designed a super cute printed invitation in Photoshop:

I did all kinds of extra projects like customized water bottles:


And sippy cups with each kid's name on them:


UPDATED 9/30/13: I just discovered that you can see all of the details from last year on my sister-in-law's blog at www.eventsthatsparkle.net!

This year we've got a Minnie's Bowtique themed birthday party and I did design the invitation, although I sent it out electronically because I was running out of time:


I'm fancying up the treat bags and making Minnie cupcakes but that's about it. I did a trial run of the cupcakes for my daughter's preschool class, but it was before the bow mold I ordered from Amazon arrived and I couldn't find mini Oreos in the store so I improvised with chocolate candy melts and bow made out of strawberry fruit roll ups. They came out super cute but the bows were pretty labor intensive (that stuff is STICKY!) so I'm hoping bow made out of candy melts is a little easier. The party is in two days and I'll keep you posted!


Monday, August 5, 2013

Simple (?) layout

Simplicity has never been my forte when it comes to scrapbooking. I generally follow the theory that more is more. Here's a page that uses only five supplies! I'm not sure if I should be proud of myself or concerned that something is missing. It really does feel a little... plain to me. What do you think?


The background is pattered paper from Cosmo Cricket. The flower is a large die cut from K & Co. It inspired the entire page design because it is so big and bold. The title sentiment is also from K & Co, popped up with foam tape. I keep running into sales on K & Co. products at Michaels and AC Moore and I can't help but stock up! The final supply I used was just a pigment pen to add the date in the lower right corner. One of the easiest, peasiest pages I've done in a long time! Really, is it missing something? Maybe in the upper left corner?


Wednesday, July 24, 2013

Patterned paper possibilities

I've been scrapbooking a lot lately! I know I should be packing up my craft supplies in preparation for our move instead but I just can't make myself do it until a little closer to our actual move date. Crafting makes me happy and sane, both of which I need right now!


This layout focuses my my daughter and her babysitter's daughter. I love getting photos during the day that show me how happy she is and the fun that she is having. Here I paired some patterned papers that I usually would never put together but I wanted the layout to be colorful and reflect what was going on in the photo. I thought the number paper from the My Minds Eye Lime Twist collection (I'm still really loving this stack!) was related to the fact that they are in the library (OK, letters would have made more sense...) and the cloud paper from American Crafts showed that it was a rainy day, hence my daughter's polka dot raincoat. The plaid paper (I think from the Target Dollar Spot) picked up the color of her friend's coat and the flowered strip (DCWV Kidlet stack) was fun and tied the colors together. The blue strip at the top was kind of a random addition that I'm not sure if really adding anything. I just happened to be going through my sticker stash and found the chipboard "Pals" title (DCWV) as a last minute addition. The date sticker is from the Target Dollar Spot (so many cool bargains abound there!) and the little sticker next to it that says "Sweet" was a freebie for renewing some magazine.

Maybe one of these days I can actually catch up a big and scrapbook some 2013 events! The photos in this next layout are even older, as you can see that my daughter was just a baby. How time flies!

Again I paired patterns that usually I wouldn't pick. I really am trying to use up some of my stash and stretch my creativity (sometimes with mixed results, I know!). These are some really old papers from Colorbok. I also used one of those foam craft stickers for kids as the embellishment. The journaling and date label are digital elements that I printed. I punched holes down the side and ripped some to the edge to simulate authentic notebook paper.

The photo in this last layout is from around the same time. To make it I used a lot of the scraps generated from the previous two layouts. Since I scrap 8.5 by 11, I usually cut an inch off of each sheet of 12 by 12 paper before I start using it. I've organized these 1 by 12 inch strips in a box that I can pull out when I need a quick border. I found out that they also make a cool background!


The title is from a very old DCWV kit but it just happened to fit my subject. I really am trying to use up my stash! I love that simple layered flower sticker in the lower right. Kind of hides the fact that I cut the plaid pink strip too short! A mistake is just an opportunity for creativity, right?

Friday, July 12, 2013

Kids' birthday cards

My daughter has also been invited to a lot of birthday parties lately and I've been trying to make a quick card for each kid. I've really been loving making strips of patterned paper into banners. It's fast, colorful and uses up those scraps that I always feel guilty about throwing away.

TIP: I used a square punch to make the triangular portion of the banner. You can use any size square punch as long as it's bigger than your paper strip. Just feed end of the strip through the punch, held diagonally, so you cut off a symmetrical triangle shape. So much easier than using scissors or a craft knife!


Please pardon my photography -- my scanner has been on the fritz so I photographed the cards and I don't have any kind of professional setup for card photography.

A cute first birthday card using primary colors:


I stamped the elephant directly onto the card using Charcoal Colorbox chalk ink, then drew the string of the balloon. The hat I cut freehand from patterned paper and for the balloon I used a circle punch, then inked the edges. I cut out the 1 using my Cricut and used that ever-popular Fiskars scallop sentiment punch to make the ground the elephant stands on. After cutting and assembling the banner strips, I stamped the birthday boy's name.


A horizontal variation, this one totally girlie. I'm sure you can see the influence of the first card on this one! Instead of the elephant I stamped with Charcoal chalk ink (as you can see, it's one of my favorite inks!) a large sentiment that I decorated with dots of clear Stickles. Instead of stamping directly on the card, I used a white panel and attached that to an aqua card base. I was able to wrap a piece of pink ribbon around the white panel this way (I hate for the ribbon ends to be seen in the inside of the card -- pet peeve). I stamped the birthday girl's name on white card stock and punched out the letters with a small circle punch, then attached them with pop dots. I added a Prima flower and of course a gem because this was for a very girlie two-year-old. I also embellished the designs on the patterned papers with additional Stickles, because you can never have too much glitter, right?!

Wednesday, July 10, 2013

Three months... three years

OK, it's like a I'm a once-a-month blogger. Can that be a new thing? Well my same excuses continue regarding work on the new house, which we still haven't moved into yet. The IKEA cabinets are finally installed though! To add to my list of distractions, my daughter's daycare provider quit on me and I'm scrambling to find care for the summer until she starts preschool in September. How she's almost three years old, I have no idea! It makes me nostalgic so I'm going to share a layout I recently completed (yes, I am VERY behind) from when she was just about three months old. The journaling details how I when we first talked about naming our daughter, I didn't want people to call her "Dolly" as a nickname but it has since stuck and totally fits her.


No special techniques used here. It's a hybrid layout. I printed the journaling out directly onto white cardstock. Created the title block digitally, printed it out and glued it on over two rectangles and a strip of patterned paper. Added a sticker and a flower gem. I am proud to report that I used a WAY old piece of patterned paper from my stash. The brown piece is from one of those Paper Pizzazz 8.5 by 11 booklets. Probably some of the first scrapbooking paper I ever bought, way back in the early 90s -- before 12 by 12 paper was even available, I think! I pared it up with some "modern day" Basic Grey (hearts) and DCWV (plaid).


Friday, June 14, 2013

Bubbe

So I'll say it again (yes, it's like Groundhogs Day -- have you ever seen the movie?) I have been creating but I haven't been blogging. We're attempting to finish our new house so we can finally move and I have huge work event and well there really is only so much time in the day. I guess I would rather make memories and capture them than detail my process.

Anyway, my husband's grandmother passed away two years ago yesterday. She really was a great woman -- smart, strong and opinionated, protective of her family and its traditions, but warm and welcoming. My husband saw this layout that I made of her and my daughter not too long before she died and kept asking to see it. So this one's for him.


The pink flowered and brown striped papers and the title stickers actually came from a kit, which I rarely buy. I believe it's Cloud 9 by Colorbok/Fiskars because that's what the stamps are. I looked at the flowered paper and thought, "That looks familiar!" and realized I had the coordinating stamps (Chocolate Chalet) so I used them to stamp the title block. I think it came out a little busy but it conveys the fun these two were having.

And here's another one also featuring my daughter and her great-grandma.

This one uses that brand of paper that Michaels sells, Reminisce I think (paisley), and a sheet from a new stack I just bought by My Minds Eye, Lime Twist. Yes I was supposed to be curtailing my craft purchases until after we move, but I just could not resist this stacks luscious colors and fun, versatile patterns! I was also happy to finally use the felt flower border that I've been hoarding in my stash for quite some time. I filled the flower centers in with tiny pearls and added larger pearls to the Prima flower centers.

Wednesday, May 8, 2013

"Beautiful" layout

Well the Ikea cabinet buying went better than expected although what I didn't expect was to not have time to post again until after they were already delivered! They haven't been put together by my contractor yet though so it's a ways away as to when I'll see my new kitchen completed.

Meanwhile, my parents came to town, which took away from my creating and blogging time, but I did finish more pages than I anticipated. Warning: pink, girly baby pages to come in the next few posts!

I finally was able to finish the page that I talked about awhile back, when I was making this starburst card for my co-worker as practice. The technique wasn't as time-consuming as I feared but I am glad I practiced it on a smaller scale first.


The journaling captures the first time I saw my daughter and I think this page does that moment justice. I got to use up a bunch of scraps that I really like. The title didn't work out as I originally planned but I love how glittery the letters are in person and how they curve around the photo. I love it!


Friday, April 26, 2013

Sweet Dreams

Well I have been working very hard at work, at my actual real job, so too much creating hasn't been happening. Here's a quick page that I made that is turning out to be one of my favorites.

I love the photo itself but also the way everything is arranged.The most time-consuming part was searching for the perfect embellishments that weren't too girly for this photo of my husband fast asleep with my daughter. I just happened to see these K & Co. Edamame layered stars on my craft table and I think they are perfect with the Sweet Dreams epoxy sentiment. Detail view of cluster:


Well now it's time for sweet dreams for myself! I'm off to IKEA at the crack of dawn to order cabinets for my new kitchen.

Monday, April 22, 2013

Thankful greetings from Boston


Well, it's been a little crazy in the Boston area lately. To say the least. My family and I are fine and don't really know anyone who was directly affected by the Marathon bombing. Thankfully we felt too lazy to go down to see the Marathon that day and even though my office is really close to the scene of the manhunt for the suspects, I was safe at home, three miles away.

My five year wedding anniversary and my birthday also happened the same week, and we are getting ready to move, so it was crazy on a personal level as well. 

I did get to do some crafting though -- yay! Made this cute card to thank my boss for bringing me back a beautiful pearl necklace from her trip to China:


My inspiration was this card I saw on Pinterest:
Pinned Image
This was an awesome card to use up small scraps! As you can see, I used scalloped circles instead of plain ones, moved my sentiment and raised it up on pop dots, and embossed a piece of brown cardstock with my Texture Boutique instead of using a patterned graph paper for the background. I also rounded the bottom corners and added pearls in the center of each butterfly to reflect the pearls that I was thanking the recipient for.

I fee like I'm cheating when I base my work so closely on that of someone else, but sometimes I'm in a bit of a rush and Pinterest and other sites really help get the creative juices flowing.

I have a really special scrapbook page that I've been working on that documents the first moment I saw my daughter. I'm hoping I'll get to finish it tonight (or at least sometime this week!) so I can post it.

Monday, March 11, 2013

A traditional page, made without a sketch

Usually I mock up a sketch for my scrapbook pages. It's rare for me to just sit down with a bunch of photos and make a page without having some kind of blueprint to follow. I use Photoshop to color-correct and resize my photos anyway so I usually just plop the touched-up photos into an 8.5 by 11 inch canvas. Then I can play with placement and color, add digital papers and embellishments and write up some journaling.

Sometimes I'm happy with what I've come up with and print and use it as my final page, just adding real photographic prints and maybe some traditional embellishments to an otherwise digital page. But more often I use traditional cardstock and patterned papers to create my page, just printing out my sketch to use as a placement guide, and maybe printing out my journaling as well.


This page was one of the rare instances where I had no sketch or any preconceived notion of what I was going to do before I began. I had mocked up a rough sketch but when I looked at it, I really didn't like it. Unfortunately it appears that I dislike it so much that I deleted it from my computer, so I'm unable to show it to you. It must have been really bad! Anyway, I'm not really sure I know how this page came together, but it did:


I looked at the colors in my photo and remembered this cool die-cut piece of Making Memories paper that I had been wanting to use. It was 12 by 12 so I trimmed it down to make a large frame around my 3 by 4 inch photo. Then looked for a flowered pattern to use as a background that would coordinate and reflect my daughter's flowered shirt. I found this KI Memories kit, picked a flowered paper and then pulled out an aqua dotted piece to ground the photo so it didn't look like it was floating in space. I edged the strip with a piece of K & Co pink scalloped border sticker. 

The journaling tag just happened to be on my craft table. It is also Making Memories but from a different collection (Spring Fling). It had a wide rounded rectangular hole and at first I was going to slide ribbon through it, but this Cosmo Cricket Girl Friday strip of paper fit better. I layered everything on without planning out my title. I figured it could fit under the photo but really had no plan.

I looked for items that coordinated with the Making Memories paper and found this die cut label and the tiny alphabet stickers. The "7" is chipboard and the other letter stickers are from the KI Memories kit. I outlined all of the title stickers with the same brown pen I used for the journaling to tie them all together.

The embellishments are a random collection of flowers and an epoxy sentiment from the KI Memories kit plus a K & Co tag ("Wow"). The date sticker is from one of those journaling stacks. A random assortment of products but I think they came together pretty well and tell the story of the first time my daughter picked up a Cheerio with a proper pincer grip -- even without a plan!


Wednesday, March 6, 2013

6 Month Mom Layout

I am hesitant to post a scrapbook page because I never know the source of all of my materials. But I'll do my best to identify them and then if you want to know something more specific, let me know and I'll try to sleuth it out.


This photo on this page is from nearly two years ago but I just scrapped it recently. It was taken at a family party but I used it to record my feelings about being a mom and the first six months of my daughter's life. The journaling is short but captures what I think when I see this photo: "Still pretty new to the job and winging it most days, but the first six months of being Dalia's mom were some of the best of my life!"

I tried, with this layout, to break out of my usual line-it-up-perfectly mentality and create something a little grungier and more casual. I used a piece of  DCVW cardstock (the name of the stack is now escaping me) and cut around the flocked design so I could tuck the photo behind parts of the flower image. The patterned papers at the right were from my border scrap box, which mostly contains 12 by 1 inch pieces made from trimming down 12 by 12 papers to 11 inches for my 8.5 by 11 inch pages. I know the aqua and red flowered one is Basic Grey but I'm unsure about the others.

The title block was leftover from covering a chipboard frame with cardstock. I wanted to bring in a bit of pink to make it a little more feminine and coordinate with my daughter's dress so I used a pink "6" sticker that I outlined with a black pigment pen and then doodle around it. The "mom" sticker came from an old DCWV stack. The round letter stickers at one point were clear epoxy-type domes but yellowed while sitting in my sticker stash (that's how old they are!) so I never used them before, but the yellow tint seemed to work on this page. 


The date in the upper left corner is one of my favorite details of this layout. I combined a piece of a label and part of a border sticker with a flower sticker and a gem. I now see that I neglected to erase my pencil lines -- oops! That's what happens when you're trying to finish up before nap time is over.

Thursday, February 28, 2013

Notecards for a 50th Birthday

I can't believe I have a friend who just turned 50 -- that makes me feel old! I know it is still a ways away for me, but it's a reminder that 40 is starting to loom very large. Anyway, my friend had a 50th birthday/Oscar viewing party and I wanted to give her a special present to mark such a big birthday. She is a creative type (although she'd probably tell you that she isn't( and she appreciates handmade things. She also always tells me how much she loves the cards I have made for her daughter's birthdays (which reminds me that at some point I should post the super-cute Angelina Ballerina card I recently made for her daughter's third birthday). Anyway, I figured she'd be getting lot of other presents so I decided to make her some monogrammed note cards that she could use for thank yous.


To keep things uniform and make it look like a set, I used one layout with three different color schemes and made two of each card, for a total of a half a dozen cards. The base cards are an 8.5 by 11 sheet of cardstock cut in half to make two cards that are 5.5 by 4.25 inches folded. I ran each card through my Texture Boutique using the Swiss Dots folder (love it!). Then I cut 5.5 by 3 inch pieces from three different patterned papers leftover from scrapbook pages I had made.

I then picked out coordinating cardstock from a mat stack my boss had given me for the holidays. I had never bought a small stack like this before, thinking I'd rather have larger sheets to cut down than be limited by their small size, but I found that I really liked the wide variety of colors and the ease of flipping through them to choose just the right one. They were also just the right size to make two border strips and punch two scalloped circles from with minimal waste. I used the EK Success Parisian border punch and a Marvy scalloped punch that is about 2 1/4 inches.

I had bought a large "D" stamp because my daughter's name also starts with D (I think it's Hampton Arts? The cheapo $1 ones they sell at Michaels/AC Moore). I stamped the D with Colorbox Fluid Chalk inks (my go-to inks) in Olive Pastel, Lime Pastel and Chestnut Roan on white cardstock and then punched each one out with my 2 inch Fiskars Circle squeeze punch.

I then ran all of the pieces through my trusty Xyron. I layered each D circle onto a coordinating scalloped circle. I wrapped a piece of white ribbon (from Target, leftover from my wedding four years ago) around each patterned paper panel, adhered a border strip and then placed the layered circles on the right side of each patterned panel, over the ribbon. I attached the patterned paper sections to the textured cards and then tied a piece of ribbon in a knot around the already attached ribbon. Finally I punched butterflies using my Martha Stewart punch. I attached them by cutting pop dot circles in half and putting on each wing. Then I topped each butterfly with a crystal gem.

I used one card to write a message to the birthday girl then packaged the other five up by wrapping with some baker's twine. I put them in a fabulous feathered bag (that I wish I had taken a photo of!) and gave them to the birthday girl.


Wednesday, February 27, 2013

Starburst card (nothing to do with the candy, unfortunately)

So I haven't been blogging, but that doesn't mean I haven't been creating! As my daughter has gotten older, (almost 2 1/2! -- she'll tell you that she's a "big girl") I have been snatching bits of time here and there to make cards and work on her scrapbooks. The scrapbooks are important to me so that she'll have a record of who she is and how she got that way. The cards are important because they are a much lower stress way to exercise my creativity on a small canvas that doesn't necessarily need to be of keepsake quality.

Here's a recent card that I am particularly proud of because it was the first time I created a "starburst" effect with patterned paper (I am sure this isn't the correct terminology for this, but I'm lacking time to look it up). This is something I had seen all over the place in magazines and had been pinning on Pinterest for some time and which, quite frankly looked simple to achieve digitally but too hard to do by hand. I had been struggling with scrapbooking my daughter birth and early days, feeling that no design I could come up with would somehow be special enough. Voila, "starburst" effect layout. But I wanted to practice before I did it on a scrapbook page, so came up with this card design for a co-worker's birthday.


I made a standard 5.5 by 4.25 inch card with white card stock and put a dot in the lower left corner. I then cut a long triangle from patterned paper and lined the point up with the dot. I trimmed off the excess paper that overlapped the edge of the card. Then I cut another triangle and overlapped the first one, also lining up one point with the dot on the card. I repeated until I had covered the card with a rainbow of patterned paper scraps. I thought there was probably a scientific way to do this but I just eyeballed it and I think it came out pretty well.

The point at which all of the papers met was a little sloppy. I toyed with adding a sentiment there but nothing seemed quite right so I saved the sentiment for the inside (it just says "Happy birthday" -- nothing special) and instead added a large paper flower. I layered on a smaller pink flower and of course added a little rhinestone bling in the center (those cheap adhesive gems from Michaels or ACMoore that are like $1/sheet). I stamped the recipient's name with tiny alphabet stamps in one of my favorite inks -- Colorbox Charcoal chalk ink -- added a bit more bling and I was done.

The recipient loved it and put it in her special box of cards that I've made for her that she claims she is keeping for when I'm famous (for doing what, I'm not quite sure, but I appreciate her confidence)! I loved that I used up a bunch of scraps and I got to practice a new technique, all during my daughter's nap time.

One of these days I will have a little more time to make a video or at least take pictures during each step so I can show instead of tell how I did something. Maybe when I (finally) make the scrapbook page of my daughter's birth that making that card is helping me design!